Canku Ota Logo

Canku Ota

Canku Ota Logo

(Many Paths)

An Online Newsletter Celebrating Native America


July 27, 2002 - Issue 66


pictograph divider


The " How To" Series - The Beading Loom
The Bow Loom


by Lynne Sageflower Pennington
 
 
Please be sure to read the Disclaimer for the " How To" Craft Articles - Disclaimer
 
 
In this article I will be talking about the bow loom, which was used by our ancestors, to do thin strips of beading. When they wanted to do wide strips they used a Box loom which, I will talk about in the next article.


The Bow loom consisted of:
1. A bendable branch of cedar, willow or other easy to bend wood. It was about 2-2 1/2 feet in length and about the circumference of a quarter to a half dollar. Any extending branches on the chosen branch were cut off. It was up to the user if they wanted to leave the bark on.
   
2. Two pieces of wood or bone about 4-6 inches in length and 2-3 inches wide. Lengthwise 10-11- holes were made and then on the opposite side of the length 2 holes were made about 1/16th in from the edge and about an inch from the side.
   
3. Thin long pieces of sinew were used for the warp threads. When the Europeans came to Turtle Island, traders introduced cotton threads. The thickness of the threads was like the button thread of today. A thicker piece of sinew was used to tie the warp thread holders onto the branch ends.
 
Once the loom was threaded it was time to start beading. A woman or man would sit down and place the bow leaning one end against their body and holding the middle of the bow between their knees. Over time as the beadworker gained more experience they would hold the loom in a position that was comfortable to them. (Like the picture below)

 
I am going to give instruction on how to make a modern version of the Bow Loom.
Materials:
2 pieces of 1" x 6" wood
1 piece of 2" x 24" wood board
1 piece of 2" x 12" wood board - this piece of wood will be cut for an extension to make the loom longer if needed.
Curved template
2 wood pegs
1 skill saw
 
1. Make a Curve template like below. Place it on the 2" x 24" wood board and using the skill saw cut the inner curve out and the outer curve. You want the width of your bow to be 3 inches wide.

 
When you have cut out your bow you want to cut the bow down the middle. Cut the 2" x 12" the same width to fit. Then drill two holes in each of the flat ends for your wood pegs. You only need to glue the peg in one of the drilled holes. Then drill two holes on your extension and only glue the peg in the opposite hole.


Put two notches on the ends of the bow (shown below). This will help hold the thread to tie on the Warp Thread Holder and keep it from slipping


Now lets make the Warp Thread Holders

Take your two pieces of  of 1" x 6" wood, then drill the holes into it as in the diagram below


Once you have all this done you are ready to start doing your loom work.

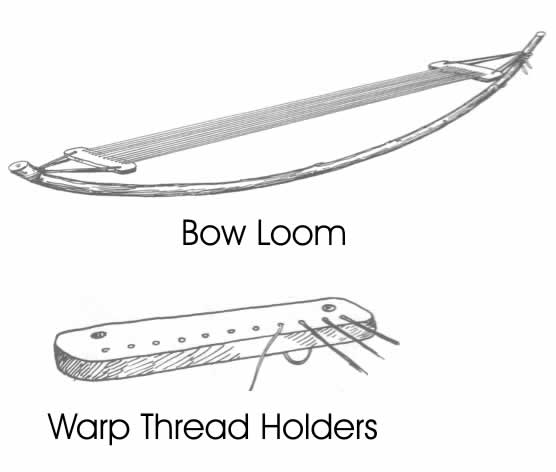
How to thread the loom - I use Nymo thread size D

The first thing you need to do is attach the Warp Thread Holders onto the bow. To do this take a long piece of heavy thread or piece of thick sinew. Wrap it around the bow once evenly. Then using the two hole side go from the top of the holder and thread the sinew or thread down into the hole and bring it back around towards the bow. Secure the two ends in a knot around the back side of the bow. Do this to both sides.

Now take a crow bead (med. size bead) and tie it to the end of a very long piece of thin sinew or your thread. You want to have it long enough to go through all 10-11 holes.. You are then going to follow the following pattern to thread the holder:

Bring the thread up into the first hole, go over to the first hole on the other sides holder and bring it down into that hole. Now go up into the next hole over and bring it over to the second hole on the other side. Continue doing this until all the holes are threaded.  If you run short of thread, tie another piece on the underside of the holder. If you look at the first picture of this article it shows the threading pattern.

This is the end of this article. In the next article I will talk about the Box loom and give instruction on how to make one.


pictograph divider


Home PageFront PageArchivesOur AwardsAbout Us

Kid's PageColoring BookCool LinksGuest BookEmail Us


pictograph divider

 
  Canku Ota is a free Newsletter celebrating Native America, its traditions and accomplishments . We do not provide subscriber or visitor names to anyone. Some articles presented in Canku Ota may contain copyright material. We have received appropriate permissions for republishing any articles. Material appearing here is distributed without profit or monetary gain to those who have expressed an interest. This is in accordance with Title 17 U.S.C. section 107.  


Canku Ota is a copyright © 2000, 2001, 2002 of Vicki Lockard and Paul Barry.

 
Canku Ota Logo   Canku Ota Logo

The "Canku Ota - A Newsletter Celebrating Native America" web site and its design is the

Copyright © 1999, 2000, 2001, 2002 of Paul C. Barry.

All Rights Reserved.


Thank You