|
Greetings Everyone,
First, I would like to thank all those who
were concerned about my health, etc. I am doing a lot better
and continue to improve everyday.
Second, I send a Heartfelt Thanks to Crazy
Crow for listing my Arts And Crafts articles in their newsletter.
When Paul brought my attention to the article it made me feel,
finally that the time I take to research and present the articles
is greatly appreciated, by many.
Third, starting in the next issue I will
be getting back to teaching how to make different Native American
crafts. Each craft will have graphics and step by step instructions.
A few people asked me if I could start with kid's games and
crafts then get into making regalia accessories like bustles,
hair ties, etc. so they could start getting these things ready
for the new powwow season, so that is my plan.
With Christmas right around the corner I
thought it would be good to get some instructions together
to make ornaments for the tree. I always wait till three days
before Christmas to purchase our tree. We always buy one which
is potted so we can plant it on my father- in- laws land.
This way we feel we have not killed a tree but made a new
home for another little animal to live in. We replant the
tree on the first day of the new year.
Tree Ornaments
Ok now on to our first tree ornament.
This ornament I make all year long and make
them as gifts for family and friends each year at Christmas.
Everyone enjoys receiving them and I try to give them a different
pattern each year.
Materials needed
- Several glass or plastic Christmas balls in different
sizes.
- Loom
- Seed Beads in different colors
- Different loom patterns
- Thread for loom and a needle
|
| Step One: |
Take the measurement of the middle circumference
of the Christmas ball |
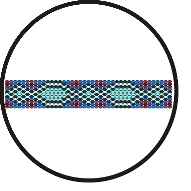
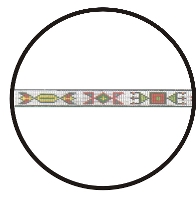
| Step Two: |
Thread your loom and choose the pattern you want
to use. Try to use a pattern that is no wider then one
inch.
If you can map the pattern out on loom paper before
you start.
|
| Step Three: |
Start making your pattern starting with
the end then working it to the other end of the pattern. |
| Step Four: |
Take a strip of leather the width of
the strip and glue or sew the strip onto it. Note: Do
not take the strip off the loom until you have the strip
attached to the leather securely. |
| Step Five: |
Once your strip is sewn or the glue is
dry, wrap the finished strip around the middle of the
ball and sew or glue the ends of the strip together. Personally,
I glue the strip down and then sew the ends together.
If I need to add in a row of beads so none of the balls
in showing I do it at this time. I take a long piece of
beading thread and go back four rows from one end of the
strip and weave it back and forth in each row of beads.
Then I add in my new row. If I need two rows I go up into
the row I just added and thread my beads for the new row.
After I have done this I attach the rows onto the other
end of the strip. |
There are several places on the web to get
loom patterns.
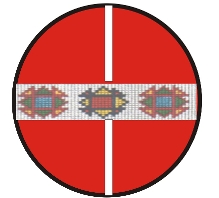
One of the other things I do to make the
balls different is add in rows vertically. I make them about
four beads wide using one of the colors in my pattern as a
main color.
Examples:
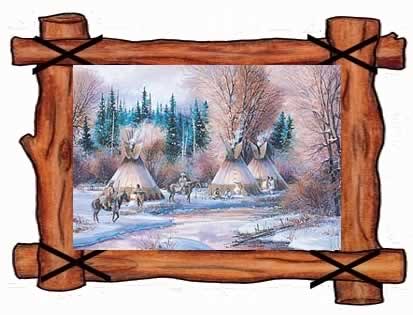
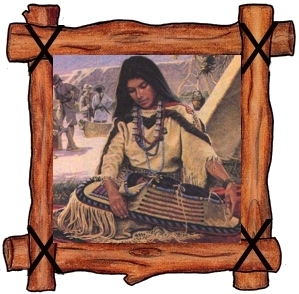
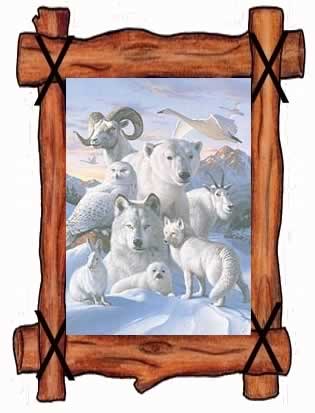
Twig Frames
The next ornament I want to talk about is uses twigs from
outside.
Materials
- Small Twigs
- small pictures
- Thread & Needle
|
| Step One: |
Collect 2 bunches of twigs. One bunch
(about 6 to 8) should be about 2 inches longer than your
photo. The other bunch of twigs should be about 2 inches
wider than your photo. |
| Step Two: |
Arrange the twigs so that they surround
the photo and extend outward about an inch in each direction.
Tie the twigs at each corner using twine or string, making
an "X" pattern |
| Step Three: |
Glue the photo onto the back of your
twig frame. Hot glue works the best. |
| Step Four: |
Glue a small loop of string to the top
batch of twigs for hanging the photo. |
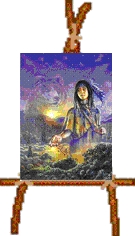
Another Twig frame you can make looks like
an A frame.
Once you make the A frame you can glue your
picture to the frame then add a little piece of twine to the
back to hang it from the branch of the tree.
| Step One: |
Cut three long
twigs and one short one. Then hot glue two of the long
twigs and the short twig together,
forming an A shape. |
| Step Two: |
Wrap the joints
with twine or yarn |
| |
|
Examples:
Another way to use the twigs is to make a
circle from them. Cut your picture into a circle then glue
it to the twigs.
Clay Ornaments
Over the years I have made clay ornaments
out of Polymer Clay using cookie cutters and templates to
make the shapes of animals or other shapes associated with
Native Americans. A good place to purchase Western cookie
cutters is at the following web site, http://www.kitchengifts.com/western.html.
They have almost every shape you can think of: Buffalo, Canoe,
Native American Woman and Mans head, Native American girl
& boy, corn, Cactus and several other shapes.
When making the clay ornaments I use Fimo
clay, because I can work with it better then other clays.
Once I have made the ornament I bake it as directed, then,
once it is baked I paint it.
Paper Twist Native American
Angel
I have also made several Native American little angels
to hang on my tree using the instructions from www.Sculpey.com
and well as other projects I have printed from the site. For
my angels I substituted the beige clay with dark flesh or
Indian Red.
The last ornament I am going to write about
is Making a Paper Twist Native American Angel which you can
use as a center piece on the table of do as I did and made
it my tree topper instead of a traditional star.
To make a paper Twist Angel you need the
following materials:
- Scissors
- Ruler
- Straight pins
- Spool wire size #18
- Wire cutters or old scissors
- paper towel dampened
- large zippered storage plastic bag
|
| If you are going to make a tree topper angel an 6"
Styrofoam cone or poster board to make into a cone shape. |
- 2 1-1/4" Styrofoam ball ( for head and bodice)
- 1/2" x 8" wood dowel
- 1 small electric Christmas light ( to tie in
hands)
- Craft Glue
- Heavy duty thread
- Spool of clear nylon thread
|
Materials for the clothing and face of the Angel:
Clothing - You can change the colors to suit what you
want to use only make sure you use the amounts needed of paper
twist or add the amounts together and make the angel all in
all white.
| Dress |
- ½ yd flesh or dark flesh Paper Twist
- 4 yds coral Paper Twist
- 3/4 turq or aqua Paper Twist
- 1 yd rust Paper Twist
|
| Wings |
- 3/4 of white extra wide Paper Twist or 2-12"
x 5" pieces
- 6" of black wool hair
- Halo and necklace
- small package of iridescent seed beads
|
Ok now for the instructions
Basic Body-Upper section
| 1. |
Cut 8 1/4" of wire, Coat it with glue. Cut one
8 1/2" x2 1/2" out of the flesh or dark flesh
Paper Twist and roll it around the wire for the arms.
Tie the arms with the heavy duty thread down ½ "
towards the ends to make the wrists. |
| 2. |
Now cut 2 5x4 pieces out of the Coral Paper Twist
for the sleeves. Using your finger gather one end of the
sleeve to fit each wrist. Overlap the sleeve edges and
tie again with the heavy duty thread. |
| 3. |
Turn each sleeve out towards the center of the arms
and glue the edges. Then take the thread and tie each
sleeve in the middle |
| 4. |
Now for the head. Take one 5x2 piece of the flesh
or dark flesh Paper Twist and cut a piece of 3 3/4"
piece of wire to use for the neck. Take one end of the
wire and glue it, then stick it into the bottom of the
head. |
| 5. |
Gather the Head paper twist with your fingers and
tie it with thread. Coat the top of the ball with glue
then place the paper onto it, use a pin to help hold it
on. Then take your 1/2" x 8" inch dowel , place
glue around one end of the dowel and stick it into the
bottom of the head about half way in. |
| 6. |
Glue the inside of the paper and smooth it down around
the shape of the ball, make sure to overlap the edges.
Then tie another piece of thread around the paper twist
and dowel to form the neck. Before doing the next step
make sure you have a smooth side facing the front. You
do not want to have one of the glued overlapped edges
in the front. |
| 7. |
Take your arms and center them behind the neck and
tie them together using an X figure with your thread. |
| 8. |
Now cut the other 1 1/4" Styrofoam ball in half
. Cut one 5" x 3" bodice strips out of the coral
paper twist. Place the half ball in the middle of the
paper and twist it in the back a few times. Glue the stem
back toward the dowel up near the neck end then tie the
remaining twist to the dowel in a X shape. |
| 9. |
Cut two 5" x 1" pieces of Coral paper twist.
Drape one piece over one shoulder then do the same to
the other side and tie to make a waist. |
Basic Body -Lower section
| 1. |
Now you need to cut the following pieces out of
the paper twist for the skirt: |
| |
- 7- 7"x 4" out of coral for under skirt
tier
- 4- 5" x 4" of the aqua for upper skirt
tier
- 6- 6" x 4" of rust for middle skirt
tier
|
| 2. |
Once you have all these cut it is time to construct
the skirt. |
| |
A. Take your 4 pieces of aqua paper and with the
angel upside down gather and tie them around the waist.
Glue the edges together.
B. Next take the rust paper and go up around 1/4"
of an inch and tie these tiers around the waist section
C. Now take the coral paper and do the same as
in B
|
| 3. |
Once all the tiers are on you are going to pull the
under tier skirt, middle tier and upper tier skirt down
towards bottom like peeling a banana skin . Do this very
gently as not to rip your tiers. |
| 4. |
At this point if you want to make the tiers a little
more over lapping each other. Each tier should be about
1" above the other. |
Now comes the time to put on the necklace(s).
String the beads onto a 5" piece of heavy duty
thread and tie it around the neck. I usually put two necklaces
on making one a little longer then the other.
Next comes putting on the hair.
1. Take a piece of heavy duty thread the color of the
hair or the clear nylon thread and tie it in the middle.
Glue the hair onto the center of the head. Then arrange
and glue down all the hair onto the sides and back. Take
a another piece of clear or black thread and tie the hair
around the neck. Separate the hair in two for braids. Braid
each side and tie the ends with clear or black thread. Then
place the braids down in front of the doll. At this point
I glue the braids down onto the front of the doll. It prevents
them from getting messed up when you go to pack the doll
away.
The Halo:
Using the 18 gauge wire thread some beads onto the wire.
Leave a 2" tail on the wire then form a circle with
the beads and wire. Stick the Halo into the head towards
the back so it looks like it is floating above her head.
You want the halo to be about 2 1/2" in diameter.
The Wings
The last part for the angel is the wings.
|
1.
|
Cut two 12" x7" pieces of white paper twist. |
2.
|
Fold the paper in half and twist the ends of the
paper into a point. |
3.
|
Glue the twisted ends onto the back of the doll up
towards the shoulders. If you want cut a small piece of
white paper to cover the twisted ends so they will not
show. |
Some good books to get about making paper twist dolls
are by McCall’s- Paper Crafts. Look for them in your
crafts stores.
In closing this article, I want to Wish everyone a Peaceful
Christmas and a Peaceful New Year. Throughout the world, in
every nation, from every heart, one prayer... That all people
live in freedom and peace reign everywhere. A Christmas wish
for you and all the world... PEACE
From
the Pennington Family-FireDancer, SageFlower, and our little
furry friends Max and Dodo Kitty ( wrote dodo because other
name I can not type lololololol)
|