|
In this article I will be talking about the Box loom and another
loom with instructions on how to make them.
Before I start this article I want to address some emails
I received about what to use if you can not find extension springs.
You can use:
|
3/8 in diameter door springs
Threaded Rod
These two are the easiest to find however there is another
way you can make the spring yourself.
Get a roll of heavy gauge wire around 24-28 gauge. Then
using a thin pen barrel or a 1/4 inch dowel, wrap the wire close
together several times. You need at least 18 inches per side.
Put a loop on each end of the wire to use for screwing the ends
to the wood.
I hope this information helps.
|
| |
| Loom 1 - The Box
Loom |
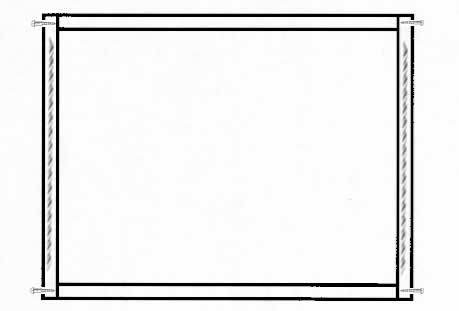
| The Box Loom was used for making wider beadwork.
The thread was wrapped around the loom like pictured below. However
the loom I am going to give you instructions on is a little different.
You will only wrap the thread on one side. This saves a lot of thread
waste. |
| |
| Materials: |
|
4 pieces of
1 ½ x 18 " wood
|
10 wood screws |
|
8 eye hooks
|
2 springs that extend to 18 inches |
| |
|
|
wood glue
|
screwdriver for screws |
|
skill saw
or hand saw
|
sanding paper |
| |
|
|
Wood pattern
for cutting two of the pieces of wood ( provided below)
|
| |
|
| 1. |
Cut the 2 pieces of wood like the diagram below |

|
| 2. |
With your 1/4 drill bit, drill holes 1" down from the
top of the wings all the way through on both pieces of wood, both
sides. Make sure you mark the wood before you drill because you
want the holes in both wings to be parallel to each other. (Diagram
Below) |
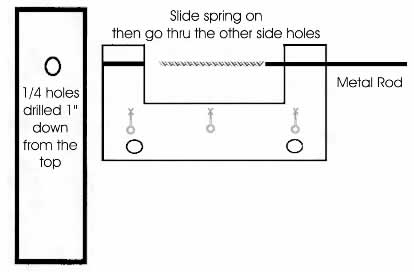
|
| 3. |
Now take a metal rod and slide it thru the first wing, then
slide your spring onto the rod and slide the end into the hole on
the other wing ( diagram above) |
| |
| 4. |
On one piece of the wood drill your 1/2 inch holes 3/8ths into
the wood 1 inch from the side and 1/16 inch from the bottom
and screw your wood screws in to keep the dowels form moving. (
Diagram Below) |

|
| 5. |
On the other piece of wood you want to drill your 1/2"
holes all the way through the wood 1 inch from the side and 1/16
inch from the bottom. ( Diagram below) |

|
| 6. |
Once the holes are done, before putting the dowels through
#5, put on your eyehooks on the outside of each piece of wood (
Diagram Above under #2) |
| |
| 7. |
Now slide your dowels through the end with the 1/2" through
holes. |
| |
| 8. |
Take the hose clamps and put one on both sides, in front of
#7 and behind #7. You will use the clamps to keep the end from slipping
once you have the loom the length you want. Just remember to tighten
the screws on the clamps. |
| |
| A picture of this type loom is in Beads to Buckskins
Volume One. I did the instructions from looking at the picture.
All the graphics for it I made myself. If you do not want to make
one yourself you can purchase one from the publisher of the book.
Page 7 of the book has the address on it or e-mail me if you want
the address. You will have to call for the price of the loom. |
| |
| In the next article I will give instructions on
how to make some other types of looms. |