Canku Ota Logo

Canku Ota

Canku Ota Logo

(Many Paths)

An Online Newsletter Celebrating Native America


July 13, 2002 - Issue 65


pictograph divider


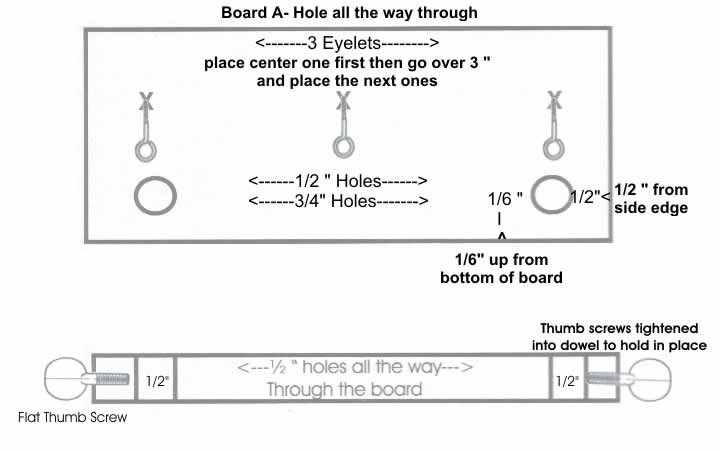
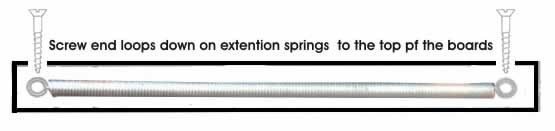
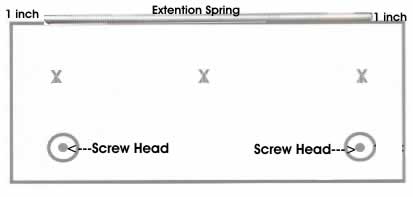
The " How To" Series - The Beading Loom


by Lynne Sageflower Pennington
 
 
Please be sure to read the Disclaimer for the " How To" Craft Articles - Disclaimer
 

Over the last few months, since I have been away, I have thought about the way I want the Arts and Crafts section of this E-Zine. When I started writing articles, I started with " How To" Projects, then I went and changed this format. I have decided to return to the " How To" Projects.

Once in awhile I will throw in an article that I received about Native American crafts or important changes to subjects dealing with NA Arts & Crafts.

So here is my first new article back to the "How To" Craft Series:

I have been asked several times about making a beading loom, so I decided to make this my first article back from my absence. I have several different types of looms ... some I made from doing research on beading looms and some my dad made for me.

The loom I will give instruction on is an Ojibwa loom. I find this loom to be the easiest to work with.

I will give you the instructions and supplies for making a 18" Loom and 36 " Loom. I am no artist but I have tried to do the graphics for them. I hope they will help.


OK, first for the materials you will need to made these two looms:

Materials for both 18" and 36 " Looms:

   
18" Loom 36" Loom
Quantity Material Quantity Material
1 1' x 6" x 8" pine (preferred) board 1 1' x 6" x 8" pine (preferred) board
1 ½ inch dowel 36" long 2 3/4 inch dowels 36" long
2 #186 coil extension springs (I got mine at Sears Hardware store) 2 #186 coil extension springs (I got mine at Sears Hardware store)
6 Eyelets ( not too large , they will hold your threads) 6 Eyelets ( not too large , they will hold your threads)
2 Thumb Screws 2 Thumb Screws
1 pkg. #6 Wood Screws 1 pkg. #6 Wood Screws
  Sandpaper   Sandpaper
  Wood Glue   Wood Glue
       
1 Drill 1 Drill
1 1/2" hole cutter bit 1 3/8" hole cutter bit
1 10-25 tap 1 10-25 tap
1 25 drill bit 1 25 drill bit
       
Directions for making and assembling 18" and 36" looms - Ojibwa Loom
 
18 Inch Loom
1. Purchase 2-1 x 6x 8 inch board - try to use pine. Cut these boards lengthwise equaling 3" per side
   
Board A
1. The through hole board - With your ½" hole cutter go in 1/6" from the bottom edge and up 1 ½ " from the bottom of the board and drill the hole all the way through the board on both sides of the bottom. ( Illustration below )
2. Cut your ½ " dowel in two pieces 18 inches long, then sand the ends smooth.
3. Insert the dowel in the hole to make sure it fits right, you want to be able to slide the dowel through on Board A easily.
4. On the sides of the board you are going to drill the thumb screw holes, centered to the dowels. You want to tap them to give you threads in the wood for your thumbscrews. ( Illustrated above)
5. Once you have this done put it aside.
   
Board B
1. With your hole cutter, cut your two dowel holes in the 1/2" diameter, however, you are only going to go 3/8" in deep into the wood.
2. Take your two dowels and glue them into these holes. Then take two wood screws and on the back side of the board screw them into the center of the dowels (  Illustrated below)
Top of Boards Extension Springs
1. Make 1" marks from each end on the top side of the board
 
2. Take one extension spring and two wood screws and insert a screw into the end loop one each side of the spring then screw then down. (  Illustrated below)


3. Once you have one side done do the same to the other board.
 
4. Now slide the dowels from Board B into the dowel holes of Board A
   
VIOLA!!!! You have your loom.
 
36 Inch Loom
You would follow the same procedures as you did for the 18" loom except you will be using 3/4" Dowels for better strength to your longer loom. DO NOT CUT THESE DOWELS IN HALF!
 
NOTES:

It is up to you if you want to make an additional board to go in the center of your loom. All you would have to do is drill the dowel holes with your cutter. Some people say it gives the loom more strength from twisting. Personally I do not use the third board unless I am putting my loom on a tripod. I find it easier to bead vertically then horizontally. All you have to do is make a tripod and attach the center board to the tripod with screws. If you want the instructions on how to make a tripod email me and I will send you the instructions.

Another good thing to have is a tray under your loom to catch loose beads if you are beading with your loom horizontally. If I am using my Tripod Loom then I put a small piece of white material under the legs of my tripod to catch the beads.

If you are like me I keep a nylon knee high and my vacuum handy. I tape the nylon to the hose of my vacuum and suck up all those run away beads. Then I empty the nylon into a bowl and fish out the beads.

Over the years I have collected different types of Loom ... from ones used by our ancestors to several my father made for me.

In the next few Issues I will give instructions on how to make them. I enjoy sharing my love for beading.

May the Creator Protect you and yours today and always, Till we meet again.
SageFlower

pictograph divider


Home PageFront PageArchivesOur AwardsAbout Us

Kid's PageColoring BookCool LinksGuest BookEmail Us


pictograph divider

 
  Canku Ota is a free Newsletter celebrating Native America, its traditions and accomplishments . We do not provide subscriber or visitor names to anyone. Some articles presented in Canku Ota may contain copyright material. We have received appropriate permissions for republishing any articles. Material appearing here is distributed without profit or monetary gain to those who have expressed an interest. This is in accordance with Title 17 U.S.C. section 107.  


Canku Ota is a copyright © 2000, 2001, 2002 of Vicki Lockard and Paul Barry.

 
Canku Ota Logo   Canku Ota Logo

The "Canku Ota - A Newsletter Celebrating Native America" web site and its design is the

Copyright © 1999, 2000, 2001, 2002 of Paul C. Barry.

All Rights Reserved.


Thank You