| In
the last article I talked about Fleshing and Dehairing, In this
article I will talk about Brain Tanning-Dry Scraping and Wet Scraping,
Stretching a hide and Smoking. |
|
| Note:
In the last article the picture of the three old time scrapers,
under "How is it done?", was a picture from www.braintan.com/intro/wetdry2.htm
. I honestly forgot where I obtained the picture, however I found
it again and wanted to make sure the site got credit for the
picture. By the way the tools were made by Chris Hanson. |
| |
| What
is Brain Tanning? |
| Brain
tanning is the process in which the brain matter of animals is used.
There are two methods of brain tanning. Wet Scrape and Dry Scrape. |
|
| What
are the differences? |
| With
dry scraping the hide is roped to a frame then the hair is scraped
off and thick places on the hide can be thinned. It requires very
sharp tools. This method helps with better brain penetration but
it can leave holes in the hide. |
|
| With
wet scraping the hide is soaked before the hair is scraped off and
it helps to remove the layers where it separates from the skin more
naturally. You use duller tools. However because you are not removing
the layers as deep as dry scraping it takes more times to have good
brain penetration. |
|
| Why
are the brains used? |
| The
brains are used because they contain oils which do not separate
when used with water. These oils will coat the hide but not saturate
into it which is what the tanner wants. |
|
| What
if you get the skin from a hunter and you do not have the animals
brains to use? |
| If
this is the case then you would go to a butcher and use beef brains. |
|
| How
process do you have to do to the brains before they are used? |
| The
First part to this process is figuring out how much brains you need.
The rule of thumb is for one hide to use two pounds of brains to
2 gallons of water. This may vary amongst other tanners on how much
they want to use. |
| |
| The
second part to this process is you have to mash the brains and the
water together to make a paste like substance. This is best done
by hand but you can use a blender. The only problem with the blender
is you can only do a little at a time. |
|
| The
third part to the process is when you have your brain paste ready
you put it in a large cooking pot and simmer it for a half an hour. |
|
| Some
tanners add herbs, bone marrow or oils like olive oil to the mixture
since some are natural tenderizers believed to enhance the absorption
of the brain mixture. |
| |
| What
do you do after you have the brain paste/mixture ready? |
| Now
here I have read two different ways to use the brain mixture on
the hide. I do not know which way is better. |
|
| The
first way is to soak the hide for a day in just water then rope
it to a frame. Then take the brain mixture, rubbing it and working
it into the hide. Let it dry, then wet the hide with water again
then apply more brain mixture. You do this until it is soft. This
can be done several times. |
|
| The
other method is putting the brain mixture into a huge 15 gallon
bucket then submerging the hide into the mixture. Since you may
not be able to submerge the whole hide at first, the brain mixture
slowly penetrated the hide making it easier to slowly submerge the
entire hide. You would only keep the hide in this mixture for a
period of 10-12 hours. |
| |
| Once
one of these process are done what comes next? |
| After
you have reached the right soften you want, the hide would then
be attached to a pole and any water or brains remaining would be
wrung out. To do this a pole would be placed between two trees and
then a second pole would be rolled into the other end of the hide.
Then it would be wrung out as you would a piece of clothing. |
|
| Stretching
the Hide |
| After
it is wrung out you want to stretch the hide so you can continue
to work on the hide I have read three ways to do this. |
|
| One
is to pierce the hide with an awl or leather punch every 3 inches
apart and about 2 inches from the edge all around the hide. Once
this is done you would attach it to a frame by lacing it to the
frame. When you have finished this you would then continue to scrap
the hide. Below are some pictures showing this being done. |
|
http://collections.ic.gc.ca/luxton/sect_3/3d9.htm
|
http://www.plimoth.org
|
| |
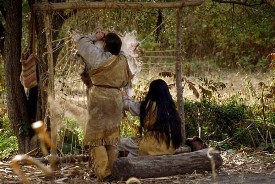
| Another
way is to use a pole that has been pounded into the ground vertically.
The hide would then be wrapped around the pole. The hide would then
be pulled back and forth and stretched. The woman on the left of
the picture is doing this process. The Woman on the Right is scrapping
a buffalo hide which has been staked onto the ground. |
|
The
Plains Indians by Colin F Taylor-Page114
|
| |
| The
third way I have read how to stretch a hide is to use a 6-8 foot
cable and cable clamps. One end about 2 feet of the cable would
be attached to a high section of the tree or pole and tightened
down with a cable clamp. Then the bottom 2 feet would be attached
lower to the tree or pole with another cable clamp. You do not want
to have it tight because you want to use this middle section for
stretching the hide. To stretch the hide you would use the cable
like you were using a vertical pole. Once this is done it is up
to you how you want to continue to work on the hide by putting it
on a frame. |
| |
| Smoking
a hide |
| This
next step smoking the hide is up to each individual person. Some
tanners will do it and some just leave the hide the color it is.
The basic reason for smoking hides is because some hides even if
they are soften get harden when they get wet. So Smoking is a process
used to act as water proofing a hide. It is also used to add color
to a hide. |
|
| There
are different ways used to smoke a hide, these method were used
by American Indian all over the world and are still used today: |
| |
| 1. |
A
pit was dug for a fire then a tripod was placed over the fire.
Once the fire was hot and smoking, the hide would be tied
to the middle of the tripod then a sack with the bottom staked
down around the fire would placed over it to catch the smoke. |
|
|
| 2. |
The
above method could also be done with an inclined stick that
was pounded into the ground or a horizontal bar hung between
two trees. |
|
|
| 3. |
A
pit was dug for a fire then using several sticks a dome was
erected above and around the pit. The hide would then be placed
on the dome and staked down. The dome was built high enough
as to not allow the hide to catch on fire. |
|
|
| 4. |
A
pit was dug for a fire then a tripod was placed over the pit.
The hide would then be wrapped around the tripod like a small
tipi. |
|
| Some
other methods were to hold the hide over a fire by hand or hang
it over the fire in the dwelling. |
| |
| This is the end
of the Preparing a Hide article. I would welcome any tanners out
there to add to send their information or correct my information
on any part of this article and what I plan to do is place any emails
sent to me in the next article before getting into the Regalia articles.
Send all emails to WtSageFlower@aol.com |
| |
|
|