|
|
Canku Ota |
|
|
(Many Paths) |
||
|
An Online Newsletter Celebrating Native America |
||
|
October 6, 2001 - Issue 46 |
||
|
|
||
|
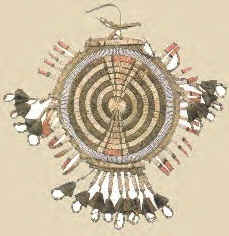
Craft Series - The Art of Quillwork |
||
|
by Lynne Sageflower Pennington |
| Over the next several months, I will be starting articles about Dance Regalia - Plains and Woodland Styles.
These articles will include clothing and accessories. However, before I start these articles I want to go over some of the ways to decorate regalia. I have already gone over beading in past issues. In this issue I will go over quillwork. There will be 2 sections to the Art of Quillwork: |
|
| Part One will deal with The history, Description of quills, how to obtain them, how to remove them, Calcification of quills, Preparing quill and dying quills. | |
| Part Two which will be in the next issue will deal with different techniques, designs, quillwork on birch bark and on leather. I will also give you a listing of books and websites on this subject. | |
|
|
| The History of Porcupine Quillwork ( Embroidery) |
| The origins of quillwork are buried in history, however archeological evidence does suggest the porcupine quillwork
has been long practiced in North America. Quillwork ( Embroidery) precedes the coming of glass beads in the mid
1800's to the natives by the Europeans. Examples of the earliest quillwork came from the Woodlands rather then the Plains. By the sixteenth century many of the ideas were taken to the plains by natives who became the Plains Indians from the eighteenth century onward. So universally, it was an art practiced by the natives in Canada, the Northeastern and Central sections of the United States and also in the wooded sections of the south where porcupines were abundant during the summer months. In regions where the porcupine was not found, quills generally became a significant trade item. Although it was the practice to use the quills from porcupines, it was not an uncommon practice to use bird quills. In later years, the shiny side of colored grasses were used to get the same effect as quillwork. When sewing threads were introduced, it was used to do fine embroidery patterns similar to the early quill decorations. For many years many quilled artifacts have been placed in museums in Europe and in the United States. Today to purchase an old piece is priceless. However, if you want to buy a piece being made today, be ready to pay a large amount . . . anywhere from $1,000.00 and up. |
|
|
| The Quills |
| Quillwork is an art done by using the white, stiff, hollow tubes with black or brown barbed tips. They are found on the head, back , tail and underside of the porcupine. They range in length from 2-5 inches and are about 1-2mm in diameter. |
|
|
| How quills are obtained |
| Since porcupine are a very slow traveling animal, they were not hard to catch by hunters. When the automobile
came along it was not hard to hit one if it was in the road, therefore they became roadkill. In some states it
is illegal to pick up anything on the road, but in some states, if you call the animal control and ask them if
it is alright for you to pick up the animal off the road some will let you. Sometimes the animal may need to be
tagged first, such as deer, before they will let you take it. Today you do not have to look for roadkills to obtain quills. Many American Indian Craft catalogs carry them. They come in 1/4 to 1 ounce bags. |
|
|
| How to remove the quills from roadside kills |
| The rule of thumb is to put gloves on and pull the quills out of the skin. You can pull them out using your
hands but be careful when pulling them out because if that little barb gets in your finger it hurts. Using pliers
can either flatten them beyond use for dyeing them or break them. Many a time when I have removed quills my fingers
often looked like a pin cushion. Once you have them pulled out you want to clean them from any fur or skin around the shaft. To do this place them in a tub of hot soapy water and lightly scrape away the fur or skin with your fingernails. If you use a knife you may cut them. In the past quills were placed in animal bladders such as buffalo and deer, however today you can keep them in storage containers by classification. |
|
|
| Classification of Quills |
|
The size quill you use will depend on your project. Below are the classifications for the part of the body from which the quills came from and what project they are best for.
Now that we have the quills and have them classified its time to prepare them for the project. |
|
|
| Preparation of the Quills |
| There are two steps in preparing quills for a project. The first is to make the quills pliable and the second
is to flatten them. First, lets discuss making them pliable. If you want to be traditional you would do this by placing them in your mouth to soften them. The mouth's saliva moistens them. The other way is to place them in a bowl of hot water to soften them. But do not soak them for too long because this will cause them to break and stretch when you are working on your project. I had this happen to me once and I had to order more quills before I could finish the project. The second part of preparing is flattening them. If you want to do this traditionally, once you have the quill moistened in your mouth you would draw them between your teeth or you could use your fingernails. They would also use flat tools of antler or bone on a hard surface such as a stone or log. This removes the air from the shaft of the quill. Today there are a variety of household tools you can use, a small metal ruler, a butter knife without a serrated edge, a spoon, anything with a flat side to it. My aunt even used a small rolling pin. Just be careful not to press down too hard; you do not want to break or rip the quill. |
|
|
| Dyeing the Quills |
| When you look at pieces of quillwork from the past and present you will not only see natural quills but also
dyed quills. The most popular colors are: red, yellow, green, purple and orange. To get these colors, the quills are soaked in mosses, roots, berries, herbs and other plants. Today when using things from nature you may often be asked to use a mordant. This helps to set and preserve the color. Without the mordant fading and bleeding of colors occurs. There are some herbs with natural mordents so you do not have to add any more. If you want to see a list of the Natural dyes used from our mother earth go to www.NativeTech.org. Tara Prindle has a great list of Natural dyes. You can also check Yarn books and Herbal books. They have lists of what to use for what color. In the 1870's aniline dyes were introduced and more often used. An example of this is Rit Dye. If you purchase quills from an American Indian craft catalog check to see if you can purchase some already dyed. Some Catalogs carry them. |
| This is the end of Part One on Quillwork. Check the next Issue for Part Two |
|
|
||
|
|
||
|
|
||
|
|
||
| Canku Ota is a free Newsletter celebrating Native America, its traditions and accomplishments . We do not provide subscriber or visitor names to anyone. Some articles presented in Canku Ota may contain copyright material. We have received appropriate permissions for republishing any articles. Material appearing here is distributed without profit or monetary gain to those who have expressed an interest. This is in accordance with Title 17 U.S.C. section 107. | ||
|
Canku Ota is a copyright © 2000, 2001 of Vicki Lockard and Paul Barry. |
||
|
|
|
|
|
The "Canku Ota - A Newsletter Celebrating Native America" web site and its design is the |
||
|
Copyright © 1999, 2000, 2001 of Paul C. Barry. |
||
|
All Rights Reserved. |
||