|
|
Canku Ota |
|
|
(Many Paths) |
||
|
An Online Newsletter Celebrating Native America |
||
|
August 25, 2001 - Issue 43 |
||
|
|
||
|
Craft Series - Hairpipes - Part Five |
||
|
by Lynne Sageflower Pennington |
|
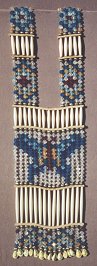
Womens Breastplates |
| The womens breastplates seen are different then the mens. Where on mens breastplates the
hairpipes go sideways on womens the hairpipe goes up and down. Northern style women's breastplates hang from the neck covering the front of the wearer. While southern style women's breastplates are hung over the shoulders covering the back and the front of the wearer. |
| Womens Breastplate #1 | ||||
| The instructions I am going to give for this womens breastplates the front is longer then the back. If you want to make them the same length then follow the front instructions for the back. |
|
|||
| Materials: | ||||
|
5 |
30 hole leather spacers | |||
|
4 |
10 hole leather spacers | |||
|
10 |
2 ½ yd. pieces of leather cording ( 2mm) | |||
|
20 |
36" pieces of leather cording ( 2mm) | |||
|
480 |
glass crow bead of one color | |||
|
480 |
glass crow bead of another color | |||
|
190 |
4" hairpipe for front | |||
| Instructions: | ||||
| Front | ||||
|
1. |
Tie a knot in each leather cording leaving a 6" tail. | |||
|
2. |
Thread 16 beads on each leather cord alternate the colors. | |||
|
3. |
Thread each 2 ½ cord thru the end 10 holes on each side of one of the 30 hole spacers. Then thread the 36" cords thru the middle ten holes of the spacer. | |||
|
4. |
Thread 30 hairpipes onto the cording then thread the cording thru another 30 hole spacer. Make sure you slide the hairpipes towards the spacer. | |||
|
5. |
Now Repeat # 5 twice again. Tie a knot in the 10 center hairpipe after the spacer to secure | |||
|
6. |
Now you should be working only with the 10 end cording on each side. | |||
|
7. |
Thread 10 hairpipes on each side then thread the cording thru the 10 hole spacers and knot each one after the spacer. | |||
| Now measure from the top of your collar bone to the top of your shoulder blade plus 3 inches. Tie a knot at that point. | ||||
| Back | ||||
|
1. |
Follow all the directions for the front but from # 8 backwards. You will have one difference, instead of three rows of 30 hairpipes you will only have two rows. After you have threaded the beads on each cord tie a knot to secure. You should have another 6" tail. | |||
| Add tin cones or cowrie shells to the cording tails to add interest. You can also make this breastplate longer by adding more section of 30 hole spacers and hairpipes. | ||||
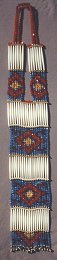
| Breastplate #2 on this one the front and back are the same | ||||
|
Northern Style |
||||
| Materials: | ||||
|
4 |
16 hole leather spacers | |||
|
10 |
4 hole spacers | |||
|
256 |
glass fire polished beads ( one color) | |||
|
256 |
glass fire polished beads ( another color) | |||
|
8 |
2 ½ yd. leather cording ( 2mm) | |||
|
8 |
36" leather cording ( 2mm) | |||
|
64 |
4" hairpipes | |||
|
72 |
1 ½" hairpipes | |||
|
32 |
Silver 1" tin cones | |||
| Instructions: | ||||
|
1. |
Thread each piece of cording thru the small end of a tin cone, knot and pull up into the cone. | |||
| Front | ||||
|
2. |
Place 4- 2 ½ yd leather cords on each side then place the 8 36" cords in the middle. Then follow this pattern for each cord:
|
|||
|
3. |
Thread the cording thru a 16 hole spacer. | |||
|
4. |
Then follow this pattern:
|
|||
|
5. |
Then thread the cording thru another 16 hole spacer, At this point tie and secure the middle eight rows after the spacer. | |||
|
6. |
Now you will be just working with the four end cording on the right and left. I am going to call this section the middle section. | |||
| Middle Section ( shoulder part) | ||||
|
7. |
Follow this pattern on both sides( right and left):
|
|||
|
8. |
Now follow # 5 thru #1 backwards. For the back section. | |||
| There are many variations on doing a womens breastplate. The two I have just given are the basic ones. Have fun and create your own. | ||||
| Cropped Short Coat/ Denim Vest | ||||
| My mom gets a catalog called Reverie( Cheyenne Outfitters). One day while my daughter and I was going thru she saw a cropped vest-style jacket. All down the front of it were hairpipe and beads. She asked me to make it for her. She wore it during Showmanship at her 4-H Horse show. I also made her a vest to match it incase the day of Showmanship was warm. I did the back decoration myself because it was plain. I also put a couple of hairpipes on the bottom of her pants hanging down. | .jpg) |
|||
| Here is how I made the jacket: I bought a black jacket from a Western Wear store. | ||||
| Materials: | ||||
|
26 |
4" hairpipes for front of Jacket | |||
|
6 |
4" hairpipes for back of Jacket | |||
|
2 |
2" hairpipes for back of Jacket | |||
|
1 |
Silver concho | |||
|
52 |
silver beads (6mm) for front of Jacket | |||
|
16 |
silver beads (6mm) for back of Jacket | |||
|
33 |
pieces of thin leather natural cording | |||
| leather needle | ||||
| Disappearing ink pen | ||||
| Instructions: | ||||
| The hairpipes are put on at a slight angle. Use the disappearing ink pen to help you do this. | ||||
|
1. |
Starting at the top, Measure two inches down from the top shoulder seam. Then two inches in from sleeve seam. | |||
|
2. |
Take the leather cording and thread it into the material like you were hand stitching (about 1/4 inch). Put an overhand knot on the end. | |||
|
3. |
Now thread a silver bead, hairpipe and sliver bead on it. | |||
|
4. |
Then make another 1/4 inch hand stitch and put an overhand knot on the end after you slid the beads and hairpipe so they are note to lose. | |||
|
5. |
Follow #2 thru #4 for the next 12 beads and hairpipes on the each side of the jacket. Place them 1 inch apart lengthwise. | |||
| Now for the back of the jacket. | ||||
|
1. |
Measure 4 inches from the middle of the neck or collar on the back of the jacket. Thread one leather cording and stitch the concho on the jacket. Then on the tails of the cording thread one bead, 2" hairpipe and bead. Tie an overhand at the ends of the tails. | |||
|
2. |
Now for the 6 back hairpipes, follow the same directions as for putting and placing the hairpipes as on the front, 3 on each side of the concho. | |||
| You can do the same as I did to a Denim Vest as i did to the cropped jacket. | ||||
| Recently I made myself a jacket from Simplicity Pattern # 9453. I put hairpipes on the front lower lapel and the pockets. | ||||
| Here is other idea: | ||||
| Long Sleeve shirt w/hairpipes and conchos | 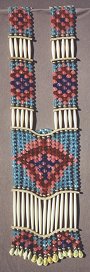 |
|||
| Materials: | ||||
|
1 |
Long sleeve denim shirt with pockets | |||
|
9 |
button covers | |||
|
11 |
Conchos ( 1"x 1 1/4") | |||
|
10 |
2 1/2 hairpipes | |||
|
5 |
1 1/2 hairpipes | |||
|
13 |
pieces of 1 mm leather cording -15" ( natural color) | |||
|
1 |
piece of 1 mm leather cording-8" ( natural color) | |||
|
1 |
yard Leather Lace | |||
| leather Needle | ||||
| Disappearing ink pen | ||||
| Instructions: | ||||
|
1. |
Take the conchos and cut small pieces of the leather lace and fill in the centers. | |||
|
2. |
Take one of them and do the following: Take the 8" leather cording, tie a knot on one end, take one of the 1 1/2" hairpipes and thread it on the cord, then bring it thru the center of the concho. Thread another 1 1/2" hairpipe on it then knot the end. | |||
|
3. |
After the conchos dry from gluing on the leather lace, glue them onto the Button Covers, set them aside. | |||
|
4. |
Now take the 2 remaining conchos and half way between the shoulder seam and the pocket, sew them on the shirt. | |||
|
5. |
Read the instructions for this step completely before doing it .Under each of the conchos in #4, use the disappearing ink pen to make marks on an angle in a semi circle for placement of 5 -2 1/2 hairpipes under each concho. You will need two marks one for the top of the hairpipe and one for the bottom. | |||
|
6. |
Now that you have the marks in place. Thread 1 piece of the 15" cording onto the Leather needle. Then insert the needle with the cording into the material like you were hand stitching. Bring the cording back up into the material about 1/4 inch then put an overhand knot on the end. | |||
|
7. |
Thread one of the 2 1/2 hairpipes on the cording, then go down into the material and come back up about 1/4 of an inch. Put an overhand knot on the end. | |||
|
8. |
Repeat # 6 & #7 for the other 4 hairpipes. Then repeat the procedure on the other concho, on the other side of the shirt. | |||
|
9. |
Using the 3 remaining 1 1/2 hairpipes, use the same procedure as # 6 & #7 and put them between the buttons down the front of the shirt. Skip place between collar button and next one down. | |||
|
10. |
Take all the concho button covers except for the one you put the hairpipes on and put them on the buttons of the shirt, leaving the top button on the front for the concho with the hairpipes. | |||
|
The next article for the Craft Series will be on preparing feathers for projects like dance fans, etc. |
|
|
||
|
|
||
|
|
||
|
|
||
| Canku Ota is a free Newsletter celebrating Native America, its traditions and accomplishments . We do not provide subscriber or visitor names to anyone. Some articles presented in Canku Ota may contain copyright material. We have received appropriate permissions for republishing any articles. Material appearing here is distributed without profit or monetary gain to those who have expressed an interest. This is in accordance with Title 17 U.S.C. section 107. | ||
|
Canku Ota is a copyright © 2000, 2001 of Vicki Lockard and Paul Barry. |
||
|
|
|
|
|
The "Canku Ota - A Newsletter Celebrating Native America" web site and its design is the |
||
|
Copyright © 1999, 2000, 2001 of Paul C. Barry. |
||
|
All Rights Reserved. |
||