|
|
Canku Ota |
|
|
(Many Paths) |
||
|
An Online Newsletter Celebrating Native America |
||
|
August 11, 2001 - Issue 42 |
||
|
|
||
|
Hairpipes - Part Four |
||
|
by Lynne Sageflower Pennington |
|
Projects covered in this article: |
|
Men's Breastplates |
| A Short History |
| Breastplates were originally made from beads and bones from lightweight birds. Then when
hairpipes came into view the hairpipe replaced the bird bones. The breastplate was worn during ceremonies, during battles for protection and some wore them just as part of their everyday wear. During my research I found out the chokers were also worn as a protection for the wearers throat in battle. This is why some breastplates have chokers attached to them. |
|
|
|
|
![]()
| Short Breastplate -Worn by both Southern and Northern Plains Tribes. | ||||
| Materials: |  |
|||
|
64 |
2" hairpipes 16 hole leather spacers glass crow beads ( 7-8 mm) 18" leather thongs (1 mm) 18" leather thongs (2 mm) 9" leather thongs (2mm) |
|||
| Lay out the 5 16 hole leather spacers in front of you. You will have a middle spacer and two on the left and two on the right. | ||||
| When I put breastplates together I start on my right side first then go to the left. I also complete the bottom row first and secure my row. You can do it anyway you want to after. | ||||
| First row starting from the bottom hole. | ||||
|
1. |
Thread one of the 18" thongs thru the middle Spacer. | |||
|
2. |
Starting on the right side follow this pattern: Hairpipe, crow bead, spacer ( bottom hole), Hairpipe, spacer ( bottom hole) | |||
|
3. |
Then repeat this pattern to the left side. | |||
|
4. |
Even out the thong so you have equal amounts on each end of the last ( end) spacers. Then secure with a knot. | |||
| Now you can continue to follow #2 and #3 or do it your own way for the next 15 spacer hole. But do not secure the top row, leave it unknotted. | ||||
| Once you reach the top of the breast plate: Right side | ||||
|
1. |
Take 1 of the 9" 2 mm leather thongs. | |||
|
2. |
Thread one end of the thong between the top 15th and 16th hairpipe, second hairpipe and spacer in from the end. Then secure it there with a knot. | |||
|
3. |
Take the other end of the thong and with the 16th end thong, tie them together in a knot | |||
|
4. |
Take one of the 18" leather thongs and tie it to the middle of the 9" thong. | |||
|
5. |
Repeat #1-4 for the Left side. Then knot the ends together of the 18" thongs. | |||
| To make the width wider for those large chested men. You can add crow beads in between the hairpipes and the spacers. | ||||
|
|
||||
![]()
| Breastplate #2 | 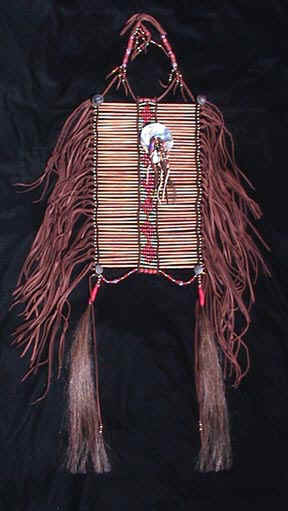 |
|||
| Materials: | ||||
|
80 |
80 4 " hairpipes 40 1 ½" hairpipes 4 40 hole Leather spacers 180 French Brass beads (8 mm) 40 18" Leather thongs ( 1 mm) 2 9" Leather thongs ( 2 mm) 2 18" Leather thongs ( 2 mm) |
|||
| Lay out the 4- 40 leather spacers in front of you. | ||||
| Starting with the center two spacers. | ||||
|
1. |
Thread one of the 18" thongs through the spacer and follow this pattern: Spacer, brass bead,½" hairpipe, brass bead, Spacer | |||
|
2. |
Now on each side ( right and left) follow this pattern: 4" hairpipe, spacer | |||
|
3. |
Center so that you have equal ends of 1 mm thong on the ends, add a brass bead then secure with a knot. | |||
|
4. |
Continue #1 through #3 for the next 40 holes in the spacer. | |||
| Ties for around the neck - Right side | ||||
|
1. |
That one 9" leather thong and thread it through the top hole of the end spacer (towards the center). Thread 10 brass beads onto the thong. Now thread the thong through the next spacer and secure with a knot. | |||
|
2. |
Separate the brass beads so you have 5 on the left and 5 on the right. Then tie the 18" leather 2 mm thong in the middle. | |||
|
3. |
Now repeat #1 & #2 to the left side and then tie the ends together. | |||
|
|
||||
![]()
| Breastplate # 3 | ||||
| Materials: | ||||
|
2 |
35 hole leather spacers 40 hole leather spacers 46 hole leather spacers Brass French bead ( 8 mm) bone 16 mm disks 20" leather cording ( 2 mm) 36" leather cording ( 2 mm) 2" hairpipe |
|||
| I am going to do these instructions in columns starting with the center section. | ||||
| Center Column | 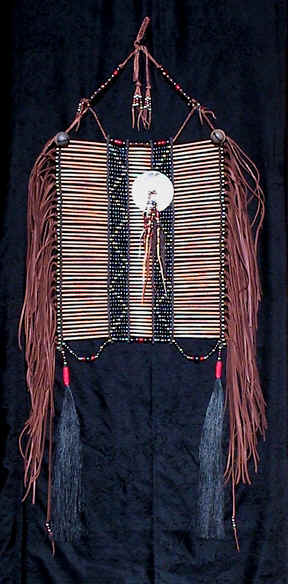 |
|||
|
1. |
Take the 2- 46 hole spacers. Using the 36" cording thread it through the spacer as follows for the first 6 holes from the bottom.
Center cording and knot off the ends |
|||
|
2. |
Now take the 2 - 40 hole spacers, starting with the 7th hairpipe from the bottom of the
center piece follow this pattern on the right then the left: Center column: Spacer, brass bead,, hairpipe, brass bead, spacer. Next column ( right and left ): Hairpipe, 40 hole spacer After you finish both right and left columns, Go back up and center cording of the second and third row of hairpipe from the top and also the first two rows on the bottom of these columns. Knot the ends. |
|||
|
3. |
In the very top row follow this pattern on both right and left side.
Put a knot at the end of the last brass bead to ensure it will not move. |
|||
|
4. |
Now take the 35 hole spacers. Starting with the 9th row from the bottom do the same pattern as you did for the center column.
Center and knot all the ends to secure the row |
|||
|
5. |
On the top and bottom two rows that do not have the four columns follow this pattern on the ends of the cording ( this will hang down): Knot, 2 brass beads, 1 bone 16 mm disk, 2 brass beads, knot | |||
|
|
||||
| I have another Man's Breastplate, it is a Breastplate with a choker. It has a lot of instructions and graphics to use. If you would like it please email me. In Subject: put Breastplate #4 | ||||
|
|
||||
![]()
| Antiquing Hairpipes |
| If you want a different look to the hairpipes for your craft then just plain white ones, you can do the following: |
| 1. Take the hairpipe you are going to use for the project and place them in a plastic
bowl. 2. Put in about 4 to 7 tea bags and cover with boiling water. 3. Let this stand for at least 2 to 24 hours depending on the color you want to achieve. Then let the hairpipe dry. |
| You can also do this with coffee grounds. 1.Place the hairpipe and coffee grounds in a plastic bowl. Then add boiling water to cover. 2.Take the hairpipe out when color you want is achieved and let dry. |
| Although you may want to try to antique the plastic hairpipe be advised that they may not pick up the color you want. |
| Dying Hairpipe Using Rit dye: I have used Rit die to dye some hairpipe using the same directions as for the tea bags only instead of the tea I place a small amount of the dye in the bowl. Then check the hairpipe till it gets to the desired color I want. Remember when using Rit dye to place the bowl out of the reach of children as it is poisonous. They may think you are making Jell-O. Oh, I have also used food coloring, Jell-O and furniture polish to also dye hairpipes. With furniture polish, you can keep rubbing the hairpipe until you achieve the color you want. |
|
The other way to dye hairpipe is by using herbs to achieve a color. Here are a few examples of herbs, color and the part of the herb to use:
|
|
|
| This is the end of Hairpipes - Part 4. In Hairpipes- Part 5 you will learn how to make Woman's Breast plates ( 2 types) , Denim Vest or Short Coat with Hairpipe decoration. This will be the last article on Hairpipes. |
|
|
| Related Links: |
|
|
|
|
|
||
|
|
||
|
|
||
|
|
||
| Canku Ota is a free Newsletter celebrating Native America, its traditions and accomplishments . We do not provide subscriber or visitor names to anyone. Some articles presented in Canku Ota may contain copyright material. We have received appropriate permissions for republishing any articles. Material appearing here is distributed without profit or monetary gain to those who have expressed an interest. This is in accordance with Title 17 U.S.C. section 107. | ||
|
Canku Ota is a copyright © 2000, 2001 of Vicki Lockard and Paul Barry. |
||
|
|
|
|
|
The "Canku Ota - A Newsletter Celebrating Native America" web site and its design is the |
||
|
Copyright © 1999, 2000, 2001 of Paul C. Barry. |
||
|
All Rights Reserved. |
||