|
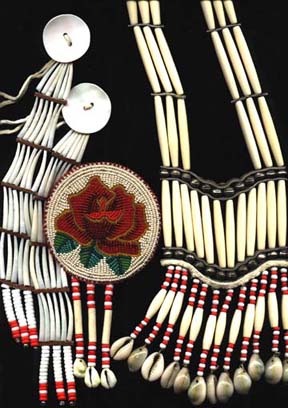
Bandolier Necklace
|
| |
|
|

A Yakima man who visited Washington in 1901, wore a bandolier of hair
pipes (and a crow style loop necklace).
|
|
Materials:
|
| |
48
|
2" Hairpipes
|
| |
1
|
6 hole spacer
|
| |
14
|
3 hole spacers
|
| |
400
|
crow beads (4 different colors =100 of each color)
|
| |
6
|
one yard pieces of (1 mm) thin leather cording
|
| |
1
|
2" Abalone disk 2 holes
|
| |
|
|
|
Instructions:
|
| |
1.
|
Take each cord and thread it the following way:
|
| |
|
|
| |
|
4 beads, hairpipe, 4 beads.
|
| |
|
|
| |
2.
|
Thread each cord through the 6 hole spacer. Then divide
each side into three cords, 3 on the left & three on the right. On
each of these three cords follow this pattern for seven sets:
|
| |
|
|
| |
|
One Set: Spacer ( 6 hole) one you started with, 4 beads,
Hairpipe, 4 beads, Spacer (3 hole)
|
| |
|
|
|
| |
|
Repeat this set for the next 6 sets.
|
|
| |
|
|
|
| |
3.
|
Once you have all seven sets done on each side, you will
have cording left. On each piece of cording thread the remaining beads
in the same pattern as you did the other beads only this time you will
not have a hairpipe or the spacer. Tie each cord together with an overhand
knot.
|
| |
|
|
|
|
How to place the disks
|
|
| |
4.
|
Thread a piece of cording between the 3 and 4th
bead on the 6 hole spacer and bring it under and up. Thread the two ends
of the cording one in each hole of the abalone disk. Tie in a knot to
secure and overhand knot the ends.
|
|

|
|
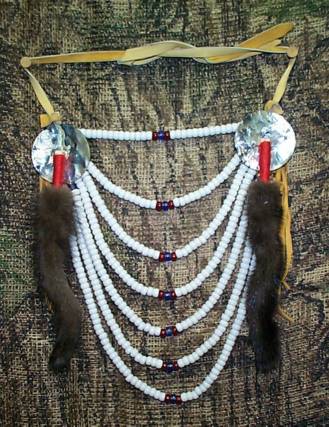
Crow Loop Necklace
|
 |
| |
|
|
|
Materials:
|
| |
2
|
1 x 17" loom strips
|
| |
4
|
1 x 18" leather strips
|
| |
17
|
36" Leather cording ( 2 mm)
|
| |
2
|
9" Leather cording ( 2 mm)
|
| |
2
|
Abalone or conch disc ( 1 1/4")
|
| |
704
|
5 mm White clam shell hishi
|
| |
64
|
5 mm Black cocoa shell hishi
|
| |
19
|
5 mm black olive shell hishi
|
| |
4
|
1" tin cones
|
| |
|
Leather hole puncher
|
| |
|
|
|
Instructions:
|
| |
1.
|
Take 2 of the leather strips and punch holes in each
strip starting 1 ½" from the top at 1" intervals for 15 hole on
both sides of the strip about 3/4 of an inch in from the edge.
|
| |
|
|
|
| |
2.
|
Starting with the top hole thread a 36" Leather cording
through the 15 holes. Knot the end so it will not pull through. Follow
the pattern below:
|
| |
|
|
|
| |
|
Row 1 - 10 white clam, 2 Black cocoa, 1 black olive,
10 white clam
|
| |
|
|
|
| |
|
Thread it cording through the other strip hole then knot
the end.
|
| |
|
|
|
| |
|
Do the same pattern for the next 14 rows only increase
the white clam shell hishi by 2 for each row ( example)
|
| |
|
|
|
| |
|
Row 2 - 12 White clam, 2 Black cocoa, 1 black olive,
12 White clam
|
| |
|
|
|
| |
|
Row 3 - 14 white clam, 2 Black cocoa, 1 black olive,
14 white clam
|
| |
|
|
|
| |
|
On the last row you should have: 38 white clam, 2 black
cocoa, 1 black olive, 38 white clam
|
| |
|
|
|
| |
3.
|
After you finish the last row, sew the loom strips 1"
from the top of the strip onto each the leather strip ( this will cover
the leather cording)
|
| |
|
|
|
| |
4.
|
Now punch another hole in the center of the top in the
strip 3/4" in from the end. Then thread one of the other 2 remaining 36"
leather cording to the ends and knot to secure.
|
| |
|
|
|
| |
5.
|
Punch two holes between the tie and the top of the loom
strip the width of the holes in the 1 ½" disk.
|
| |
|
|
|
| |
|
Attach the disk with the 9" leather cording. Thread a
hishi of each color in each cord then thread the tin cone ( small end
first) and knot the end. Slide the cord up into the cone.
|
| |
|
|
|
| |
6.
|
After this is done, sew or glue the other 2 remaining
leather strips to the back of the loomed strips for a backing to cover
everything.
|
| |
|
|
|
| |
|
Another way to do this is to use a 16 hole spacer. You
would use the top hole for the neck cording ties.
|
|
|
|
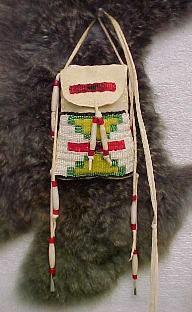
Pouch
with Hairpipe Fringe
pouch created and beaded
by Kathy Anderson of Neokistomi (www.neokistomi.com)
|
| |
|
|
 |
|
Materials:
|
| |
|
Pouch ( pre-made whether by kit or handmade)
|
| |
11
|
1 ½" Hairpipes
|
| |
110
|
beads (8 mm) 5 different colors I will refer to these
beads as 1, 2, 3, 4, and 5 in the instructions.
|
| |
11
|
drilled cowrie shells or if you want to you can use cones
on the ends, you will need 11 pony beads (E beads), if you use cones.
|
| |
4
|
yards sinew ( just to on the safe side)
|
| |
|
Glovers needle or leather needle
|
| |
|
|
|
Instructions:
|
| |
|
If you are going to bead the front face and/or back of
your pouch my advise is to do this before you put the pouch together.
then follow the instructions below.
|
| |
|
|
| |
1.
|
Thread the sinew onto the needle. Tie an overhand knot
on the end.
|
|
| |
|
|
|
| |
2.
|
With your pouch turned on the correct side, pull the
thread through on of the bottom side of the pouch.
|
| |
|
|
|
| |
3.
|
Thread the sinew as follows:
|
|
| |
|
|
|
| |
|
Bead 1, bead 2, bead 3, bead 4, bead 5, 1 ½"
hairpipe, bead 5, bead 4, bead 3, bead 2, bead 1, shell
|
| |
|
|
|
| |
4.
|
Now thread the sinew back up through the beads and back
up into the pouch. Go over about 1/4 of an inch, pull the sinew back through
the bottom of the pouch and start the next strand of fringe. Continue
to do this until you have 11 strands of fringe. Tie an overhand knot to
secure the last stand of fringe inside the pouch.
|
|
|
|
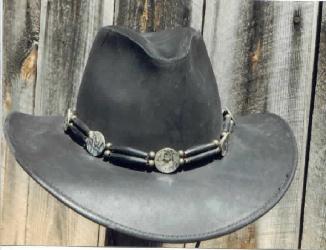
Hatband for Western Hats
|
|
|
This is the one I have on my Black Western hat. I have
received many compliments on it. I saw this as a necklace and decided
to try it as a hatband.
|
| |
|
|
 |
|
Materials:
|
| |
8
|
silver 18 mm x 8 mm beads
|
| |
8
|
1 ½" bone hairpipes
|
| |
20
|
Glass crow beads (I used Turquoise)
|
| |
38
|
smaller pony beads (3/0 in size) (I used peach and silver)
|
| |
|
silver Concho 1"x 1 ½"
|
| |
1
|
jump ring
|
| |
2
|
small silver feather charms
|
| |
4
|
medium silver feather charms
|
| |
2
|
1 ½" yards of natural leather cording
|
| |
|
|
|
Instructions:
|
|
| |
1.
|
Thread both pieces of cording through the concho. Even
out the cording on both sides. Put a overhand knot in each cord close
to the concho center.
|
| |
|
|
|
| |
2.
|
Attach the two smaller feathers onto the cording in the
center of the concho.
|
| |
|
|
|
| |
3.
|
After you get this done tie knots close to the ends of
the concho outside edge.
|
| |
|
|
|
| |
4.
|
Then follow this bead and hairpipe pattern:
|
|
| |
|
|
|
| |
|
crow bead, 2 pony beads (silver then peach), silver bead
, 2 pony beads (peach then silver)
crow bead, 1 ½" hairpipe, crow bead, 2 pony beads (silver then
peach), silver bead , 2 pony beads
(peach then silver), crow bead,1 ½" hairpipe, crow bead, 2 pony
beads (silver then peach), crow bead, 2 pony beads (peach then silver)
|
| |
|
|
|
| |
5.
|
Repeat this pattern on the remaining 3 pieces of cording.
|
| |
|
|
|
| |
6.
|
Once you have them all done, place it around the hat.
At this point either increase or decrease the ending beads to fit your
hat.
|
| |
|
|
|
| |
7.
|
Now tie all the cording into a tight knot in the back
of the hat. If you want to before tying the knot put another concho on
then tie the knot.
|
| |
|
|
|
| |
8.
|
Measure the remaining cording from where your hat sits
on the back of your head to the middle of my shoulder blades and cut it
even at that point. If you do not want it even then just leave it alone.
|
| |
|
|
|
| |
|
Then on each cord thread three pony beads, alternating
the colors, then the medium size feather charm and thread on the crimping
bead on the cord . Bring the cord up around the hoop on the medium size
feather and back up into the crimping bead and secure.
|
| |
|
|
|
| |
|
One last thing. On the concho in the front, I glued in
pieces of the cord to fill in the gaps. I would suggest doing the same
thing if you have one on the back.
|
|
|
|
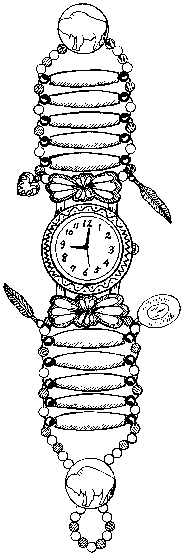
Watch bands made with Hairpipe
|
| |
|
|
 |
|
In some craft store you can still find the watch parts to do this
project. You can add charms onto it with jump rings if you want to. Although
these instructions are for watch parts you purchase at a craft store I
have done this with a regular watch that the strap has broken off of.
|
| |
|
|
|
Watch band 1
|
| |
|
|
| Materials: |
| |
|
Watch face
|
| |
|
Watch clips
|
| |
10
|
1 ½" Hairpipes
|
| |
4
|
Crimp beads
|
| |
24
|
Black beads 6 mm
|
| |
24
|
Silver beads 4 mm
|
| |
48
|
Black seed beads
|
| |
24"
|
Sinew
|
| |
|
|
| Instructions: |
| |
1.
|
Take the pins out of the back of the watch face. You
will place them back in later. Thread each end of the sinew through one
of two holes on each of the watch pins. Now in a weaving pattern (I will
explain this) follow the following pattern for each side.
|
| |
|
|
| |
|
Black seed bead, Black bead, Black seed bead, silver
bead
|
| |
|
|
| |
|
Now, take each end and thread the ends through the hairpipe
in opposite directions. Then follow the above bead pattern again. You
will follow these instructions for the next 4 hairpipes.
|
| |
|
|
|
| |
2.
|
Once you have both sides done you are going to thread
each sinew end through the end holes of the watch clips. Thread a crimping
bead onto the sinew and clamp down the crimping bead to secure with a
pair of needle nose pliers or jewelry pliers.
|
| |
|
|
|
| |
|
Now replace the watch pins back into the back of the
watch face.
|
|
|
|
|
Watch Band 2
|
| |
|
|
|
|
Materials:
|
|
| |
|
Watch face
|
|
| |
|
Watch clips
|
|
| |
10
|
1" Hairpipes
|
|
| |
20
|
Black beads 4 mm
|
|
| |
25
|
Turquoise beads 4 mm
|
|
| |
29
|
Silver beads 4 mm
|
|
| |
2
|
Buffalo buttons ( you can buy these a a fabric store)
or 2 buttons with one shank on the back and about a nickel size.
|
|
| |
22"
|
Sinew
|
|
| |
26"
|
Sinew
|
|
| |
|
|
|
|
Instructions:
|
|
| |
1.
|
Remove the spring pins from the watch. put it aside.
|
|
| |
|
|
|
| |
2.
|
Take one of the buttons, thread the ends through the
shank in the button and equal out the ends. Put the ends through the loop
of sinew and pull tight, tie a double overhand knot against the button
shank.
|
|
| |
|
|
|
| |
3.
|
Now follow this pattern to each strand of sinew: 2 silver
beads, 1 turquoise bead, 1 sliver bead, 1 turquoise bead, 1 black bead
|
|
| |
|
|
|
| |
4.
|
Thread a hairpipe on one of the strands, then thread
the other strand of sinew through the opposite
way through the hairpipe.
|
|
| |
|
|
|
| |
5.
|
Repeat steps #3 and #4 for the next 4 hairpipe sets,
only use one sliver bead instead of two at the beginning.
|
|
| |
|
|
|
| |
6.
|
When you reach the last hairpipe follow this bead pattern:
silver bead, turquoise. bead, silver bead
|
|
| |
|
|
|
| |
7.
|
Once you reach the end of this, you are going to attach
it to the watch. Thread each strand in the opposite direction through
the tube on the back of the watch attachment and tie ends together with
an overhand knot.
|
|
| |
|
|
|
| |
8.
|
Now for the other side
|
|
| |
|
|
|
| |
|
Thread the ends of the sinew through the shank on the
button and thread the ends through the loop of the sinew. Pull tight (
do not tie a double knot this time).
|
|
|