Canku Ota logo

Canku Ota

Canku Ota logo

(Many Paths)

An Online Newsletter Celebrating Native America


July 14, 2001 - Issue 40


pictograph divider


Craft Series - Hairpipes - Part Two


by Lynne Sageflower Pennington


Note that the photographs are provided as examples NOT as models or replicas for the projects.

 
  Photo -  Five Chokers

Projects covered in this article:
How to make:

 
On some instructions I have given the modern way to do the project but mainly I have used the old ways.
 

Old Way to make end spacers
To make end spacers if you want to do your project in the old way you will need pieces of leather to cut circles or squares form.
 
I use a nickel or quarter and trace round it depending on how many strands I am going to have. Then fold the circle or square in half and put a hole with the awl about 1/4 inch from edge center.

Old Style Ends

Then Depending on how many strands I want I unfold the circle or square and using the awl I put holes down the center of the circle or square about 1/4 inches apart. ( 4 holes shown in above graphic)

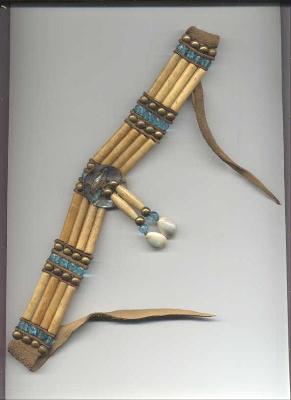
Two stand Bracelet-This bracelet fits a 6½ to 7½ wrist.
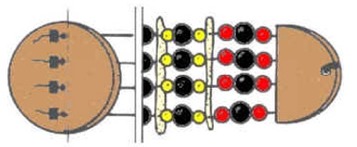
 Photo - Three Strand Choker
     
Materials Old Way
  2 Small pieces of leather for end spacers
  2 Pieces of leather for ties ( about 7 ")
  6 Two hole leather spacers
  16 Black glass round beads (about 6 mm)
  2 White glass round beads         " "
  8 ½" bone hairpipe
  2 1" bone hairpipe
  2 18" stands of sinew
     
Instructions:
  1. Take one of the small pieces of leather and fold in half so you know the center, unfold it and put two holes with an awl about 1/4 inch apart down the center. Do the same to the other piece. Fold the piece of leather in half again then on the center of the curve go in about 1/3 inch and put one hole in the center with your leather hole puncher or your awl.
     
  2. Take one piece of sinew and thread it through the hole, do the same with the other piece of sinew, then tie them together to secure.
       
  3. Proceed in the following pattern:  
   

Row 1-black bead, ½ " hairpipe, black bead, Spacer, white bead, Spacer, black bead, ½ " hairpipe, black bead. Spacer, 1" hairpipe, Spacer, black bead, ½ " hairpipe. black bead, Spacer, white bead, Spacer, black bead, ½ hairpipe, black bead

Row 2-Follow the same pattern

       
  4. At this point you will be at the end on this row.  
       
  5. Take the other piece of leather and do the same thing as #1 except do not put the other piece of sinew through the hole since you have another roll of #3 to do.
       
  6. Repeat pattern for beads and hairpipe as in #3 for other piece of sinew.  
       
  7. When you reach the end, thread sinew through the other hole in the leather and secure.
       
  8. Now OK you ask how am I suppose to tie it on my wrist?????. Well this is where the two pieces of leather tie come in.
       
  9. Make a small slice in the leather ends you connected your beading and hairpipe to. Remember not to go to close to the edge. Go in about 3/16 from the edge. Thread the leather tie through the slit and secure it. Tie a knot in it or pull the tie through so it is folded in half.
       
    If your wrist is smaller or bigger, I suggest adding beads not hairpipes.
       
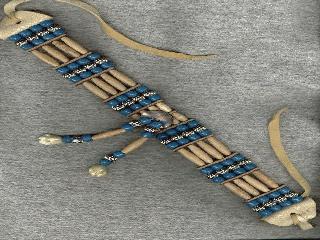
Materials Modern way  
  1 Medium silver lobster claw ( set) Claw part and ring  
  4 Silver crimping beads  
  8 Two hole leather spacers  
  16 Black glass beads (6 mm)  
  2 White glass beads      "  
  4 Black glass beads ( 4 mm)  
  2 Silver beads ( 6 mm)  
  8 ½" bone hairpipe  
  2 1" bone hairpipe  
  2 18" stands of sinew  
    Jewelers pliers  
       
Instructions:  
  1. Separate the lobster claw set. Thread both pieces of sinew through the crimping beads, then the lobster claw. Bring the sinew back through the crimping beads and secure with the pliers.
       
  2. Thread the two ends of the sinew through the silver bead and then separate the strands.
       
  3. Using one strand at a time follow the following pattern  
       
    black bead, Spacer. black bead, ½ " hairpipe, black bead, Spacer, white bead, Spacer,
    black bead, ½ " hairpipe, black bead. Spacer, 1" hairpipe. Spacer,  
    black bead, ½ " hairpipe. black bead, Spacer, white bead, Spacer,  
    black bead, ½ hairpipe. black bead, Spacer, black bead  
       
  4. Then thread the sinew through the Silver bead, leaving a tail.  
       
  5. Now repeat # 2, starting with the silver bead, through # 4 with the second piece of sinew.
       
  6. Now that the two pieces of sinew are both through the silver bead, thread the two remaining crimping beads through the sinew and the silver loop from the other side of the lobster claw, bring the sinew back through the crimping beads and secure with the pliers
       
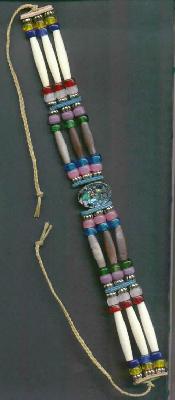
    Remember, use you own colors for your creations. I just used the colors I did for the instructions.
       
    You can follow the same instructions for a choker as in the bracelet patterns. The only thing different would be the length and beads used. Measure your neck to get the correct number of beads or hairpipe you need to add.

Two Strand choker with horsehair - ( Purchase horsehair from supplier) Old Way
      Photo - Three Strand Choker (blue)
Materials:
  32 glass crow beads
  18 brass beads
  8 1 ½ " bone hairpipe
  2 1" bone hairpipe
  2 3/4" tin cones
  1 Small bunch of horse hair
  4 ft piece of sinew
  7 Two hole spacers
  2 Small pieces of leather for end spacers
  2 1 ft pieces of leather lace
     
Instructions:
  To start
    Take one of the small pieces of leather and fold in half so you know the center, unfold it and put two holes with an awl about 1/4 inch apart down the center. Do the same to the other piece. Fold the piece of leather in half again the on the center of the curve go in about 1/3 inch and put one hole in the center with your leather hole puncher or your awl.
       
  1. Cut 2 ft off the 4 ft sinew, thread it through one hole, do the same with the other 2 ft piece of sinew, through the other hole and then tie them together to secure.
       
  2. String 8 crow bead one each piece of sinew, push them back so they are snug with the spacer.
       
  3. Follow the following pattern for beads and hairpipe from #2
   

Row 1-brass bead, 1 ½" hairpipe, brass bead, spacer, brass bead, 1 ½" hairpipe, brass bead, spacer, brass bead,1 ½" hairpipe, brass bead, spacer, brass bead,1 ½" hairpipe, brass bead, spacer


Row 2-Follow the same pattern


  4. You should be back to two ends of sinew now. Tie the two ends of the sinew to secure this part of the choker. ( Suggestion: Place a small dab of glue on any knots you make to help keep them from undoing.) Put the choker aside for a few minutes.
       
  Second piece of the choker.  
  5. Pick up the remaining 1 foot piece of sinew. Tie the end around a small bunch of horse hair ( about 15 hairs) Thread the sinew up into the large opening of a cone. Gently put the horse hair up into the cone. Thread one of the brass beads, then thread one of the 1" hairpipes onto the sinew.
       
  6. Pick up your choker, Thread the sinew through the bottom hole of the middle spacer of the choker. Pull this tight.
       
  7. Thread a brass bead, the other 1" hairpipe, then the cone this time going from the small end down.
       
  8. Slide this up towards the spacer, tie the end of the sinew around the center of the remaining small bunch of horsehair.
       
  9. Now pull the horsehair up into the large end of the cone as close as you can.
( Suggestion: this is what I do, I look at the remaining tail I have of sinew, tie the horsehair in the center of it, then thread the end back up into the cone, tie the end between the cone and the hairpipe and put a dab of glue there.)
       
  10. If you do not do as I suggested above, trim off the excess sinew.
       
  Now almost done.  
  11. Take the 2-1 foot lace ties and tie one on one side and one on the other of end spacers between the beads.

Breastplate Choker Old Way Photo - Six Strand Choker
     
Materials:
  122 glass round beads ( 6 mm)
  40 pony beads ( 3/0 size)
  8 1 ½" hairpipes
  32 1" hairpipes
  4 2 hole leather spacers
  3 17 hole leather spacers
  2 1 ft pieces of leather lacing
  15 18 inch pieces of sinew
  1 1 yard piece of sinew
  2 pieces of leather for end spacers
     
Instructions:
  To start
    Take one of the small pieces of leather and fold in half so you know the center, unfold it and put two holes with an awl about 1/4 inch apart down the center. Do the same to the other piece. Fold the piece of leather in half again then on the center of the curve go in about 1/3 inch and put one hole in the center with your leather hole puncher or your awl.
       
  1. Take 1/2 yard of the 1 yard piece of sinew. Thread it through one hole of the end leather, do the same with the other 1/2 ft piece of sinew, through the other hole and then tie them together to secure.
       
  2. Follow the following pattern:  
   

1 ½" hairpipe, spacer, glass round bead, pony bead, glass round bead, spacer, 1 ½" hairpipe

       
  3. Now follow this pattern:  
   

17 hole spacer( top hole), glass round bead, pony bead, glass round bead, 1" hairpipe, glass round bead


17 hole spacer( top hole), glass round bead, 1" hairpipe, glass round bead, pony bead, glass round bead, 17 hole spacer ( top hole)

       
  4. Now follow this pattern-  
   

1 ½" hairpipe, spacer, glass round bead, pony bead, glass round bead, spacer, 1 ½" hairpipe, other small piece of end leather, Then tie the ends together and secure.

       
  5. Do the same patterns to the other piece of sinew as in #3 & 4.
       
  6. OK now we are going to work on the remaining 15 hole of the 17 hole leather spacer.
       
  7. With 14 of the 18" pieces of sinew, I have found threading the sinew into the middle spacer helps before attaching them to the side two spacers. Thread each side after you put the sinew through the middle spacer in the following pattern:
    Right and Left sides starting from the center spacer:  
    glass round bead, 1" hairpipe, glass round bead, pony bead, glass round bead
       
  8. Thread the sinew through each side spacers, then tie a knot and glue to secure, there should be at least a 1 ½ tail on each side.
       
  9. Repeat #7 pattern for the next 13 holes down the spacer.
       
  10. In the last hole of the spacer, thread the sinew through the middle spacer and follow this pattern on each side:
    3 glass round beads, pony bead, 3 glass round beads, pony bead, 3 glass round beads
       
  11. Secure these as you did in #8.  
       
  12. Take the 2 leather laces and tie one to each end of the choker main part between the Hairpipes.

5 Strand Ermine Tail Choker Photo - Four Strand Choker
     
Materials:
  2 ermine tails ( Purchase from supplier)
  130 8 mm beads (for the purpose if the instructions I am going to use black beads)
  5 5 hole spacers
  30 1 ½" Hairpipes
  1 1 yard piece of sinew
  1 12" piece of sinew
  2 silver cones ( 1 inch)
  1 2 hole abalone disk - 3" disk (you could also use a conch 3"disk, it is your choice)
  2 12" leather thongs for ties
  2 Pieces of leather for end spacers
     
Instructions:
  To start
    Take one of the small pieces of leather and fold in half so you know the center, unfold it and put five holes with an awl about 1/4 inch apart down the center. Do the same to the other piece. Fold the piece of leather in half again then on the center of the curve go in about 1/3 inch and put one hole in the center with your leather hole puncher or your awl.
       
  1. Starting with the bottom hole of one of the end spacers thread the sinew through it and knot with an overhand knot.
       
  2. Now follow this pattern with beads and hairpipe for the base row:
   

Bead, hairpipe, bead, spacer, Bead, hairpipe, bead, spacer, Bead, hairpipe, bead, spacer, Bead, hairpipe, bead, spacer, Bead, hairpipe, bead, spacer, Bead, hairpipe, bead, other end leather

       
  3. Now thread the sinew up into the next hole of the 5 hole spacer and repeat the beading and hairpipe pattern.

Repeat steps # 2 through #3 until you reach the end spacers last hole. Tie an overhand knot to the sinew once you thread the sinew through that last top hole of the end spacer.
       
  4. Now take an ermine tail and tie the 12" piece of sinew onto the end of the tail, Thread the sinew up into the larger end of a cone and pull the tail up into the cone. Take the abalone disk and thread the sinew through one of the holes.
       
    Using the middle spacer, thread the sinew through one side of the spacer, center the disk and bring the sinew around the spacers other side and thread it through the other hole in the disk., pass the sinew through the smaller end of the other cone and tie on the other ermine tail. Pull the tail up into the cone and secure it there. I use a small amount of glue to help secure it.
       
    Tie the leather thongs on the end spacers to use as ties to go on the neck.
   

Turquoise nuggets and Hairpipe Choker/Earrings
       
Materials: Photo - Four Strand Choker (turquoise)
  36 pieces of turquoise nuggets ( you can get these in craft stores they come in a small clear box) Try to get the pieces all the same size
  13 1" hairpipes (11 for choker - 2 for earrings)
  13 1 ½" hairpipes (11 for choker - 2 for earrings)
  5 2" hairpipes
  4 5 hole spacers
  2 Leather End Spacers
  98 silver seed beads (size 10)
  1 2" two hole abalone disk
  1 1 1/8" two hole abalone disk ( you are going to have to drill a hole in the top of each disk like in one hole disk)
  1 ½ yards of sinew  
  1 12" piece of sinew  
  1 8 " piece of sinew  
  2 silver fish hooks (editors note: I think silver is a color here. Not the precious metal!)
       
Instructions:  
  1. Starting with the bottom hole of the end spacer, thread the sinew through it and knot with an overhand knot.
       
  2. Now follow this pattern with nuggets and hairpipe for the base row:
   

1" Hairpipe, silver seed bead, nugget, silver seed bead, spacer, silver seed bead, nugget, silver seed bead, 1 ½" Hairpipe, silver seed bead, nugget, silver seed bead, spacer, 2" Hairpipe, silver seed bead, nugget, silver seed bead, spacer, silver seed bead nugget, silver seed bead, 1 ½" Hairpipe, silver seed bead, nugget, silver seed bead, spacer, silver seed bead, nugget, silver seed bead, 1" Hairpipe, spacer ( This is the end spacer)

       
  3. Now thread the sinew up into the next hole of the 5 hole spacer and repeat the nuggets, seed beads and hairpipe pattern.
       
    Repeat steps # 2 through #3 until you reach the end spacers last hole on the top row. Tie an overhand knot to the sinew once you thread the sinew through that last top hole of the end spacer. 
       
Now put this aside for a minute.  
  4. Thread the 12" piece of sinew and put an overhand knot on one end. Then thread the nugget, seed beads and hairpipe in the following pattern:
   

silver seed bead, 1 ½" Hairpipe, silver seed bead, nugget, sliver seed bead

       
    Take the abalone disk and thread the sinew through one of the holes. Using the middle 2 inch hairpipe, thread the sinew around the hairpipe, center the disk, bring the sinew around and thread it through the other hole in the disk.
       
    For other end of the sinew thread the nugget. seed beads and hairpipe in the following pattern:
   

silver seed bead, nugget, silver seed bead, 1" Hairpipe, silver seed bead

       
    Tie an overhand knot at the end to secure
       
Earrings:  
  1. Take the fish hooks and attach them on the hole at the top of the abalone disks.
  2. Now follow the same instructions above as if you were attaching the disk into the choker except you will not be threading the sinew around a hairpipe.
       
You can use other stone nuggets to do this necklace and earrings also like Coral, Tiger eye, Malachite, Amethyst, Lapis or Hematite. You can find these at the Suppliers I listed in Part 1.

 
This is the end of Hairpipe -Part 2. In Hairpipe- Part 3 you will learn how to make a Bandolier Necklace, Crow loop necklace, and Pouch with Hairpipe fringe, Hatband for Western hat, Watch Bands.

pictograph divider


pictograph divider

 
  Canku Ota is a free Newsletter celebrating Native America, its traditions and accomplishments . We do not provide subscriber or visitor names to anyone. Some articles presented in Canku Ota may contain copyright material. We have received appropriate permissions for republishing any articles. Material appearing here is distributed without profit or monetary gain to those who have expressed an interest. This is in accordance with Title 17 U.S.C. section 107.  


Canku Ota is a copyright © 2000, 2001 of Vicki Lockard and Paul Barry.


Canku Ota logo


Canku Ota logo

The "Canku Ota - A Newsletter Celebrating Native America" web site and its design is the

Copyright © 1999, 2000, 2001 of Paul C. Barry.

All Rights Reserved.