|
|
Canku Ota |
|
|
(Many Paths) |
||
|
An Online Newsletter Celebrating Native America |
||
|
May 19, 2001 - Issue 36 |
||
|
|
||
|
The Beading Series - Part 6 |
||
|
Side Weaving ... Square, False loom, Off-Loom ... Brick, Comanche or Cheyenne stitch |
||
|
by Lynne Sageflower Pennington |
| In this Beading Series Article I will be giving instruction on: Side Weaving ... Square, False loom, Off-Loom ... Brick, Comanche or Cheyenne stitch |
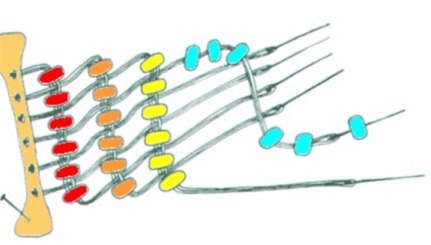
| Side Weaving: |
| Side Weaving. A hand weave technique in which the beading is done on an angle. It is done with several threads and needles |
|
|
| Instructions |
|
For these instructions I am going to use 6 threads
|
|
|
| Square, False loom, Off-Loom: | ||
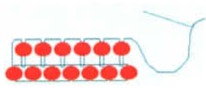
| Square, False-Loom or Off_loom technique: A technique that resembles loomed work that does not require the use
of a loom or supporting frame for the thread. Starting with a string of beads, each new row is begun by picking up two more beads and passing the thread through the end most bead of the previous row and back through the second of the beads just added, to form a square of four beads After that, the row is completed by adding one bead at a time, so that the beads are arranged side by side, directly above and below each other, with the thread showing between the rows. |
||
| Instructions | ||
| Row 1 ... String on the amount of beads you want for your project width onto your thread. Row 2 ... Pick up a new bead, go back through the last bead in the previous row then up and through the new bead you added. Add each bead in the same manner. |
||
|
|
|
|
| 3. Repeat #2 until you get the size you desire. I suggest that when you finish a row, go down and back through the entire last row you did then up and through the row your just finished to reinforce your work. |
||
| Increasing | ||
| To increase at the end of a row is easy. After you have reinforced the previous row, string the rest of the beads you want to add. Then work back the same way as you would normally. |
||
|
|
||
| To increase at the beginning of the row First, you have to complete the row, reinforce, then work to the end of the next row. String the beads you want to increase by, then work across the underside of the new beads to fill in the row below. Continue through the rest of the row and through the new row to reinforce. Another way to increase is by a vertical column within a row. To do this add two beads instead of one. You would most likely do this when doing the tubular square stitch. |
||
|
|
||
| Decreasing | ||
| To decrease at the beginning of a row. When you come back through the top row in your increase , stop at the end of the row you just did at the bead directly below the first bead of your new row and then work from there. |
||
|
|
||
| To decrease at the end of a row. Do not add any more beads, reinforce through the beads below the top row. To decrease within a row. Do not add a bead to one of the beads in the previous row. |
||
| Tubular Square Stitch | ||
| To work this stitch it is the same procedure as doing the flat square stitch. The only difference is that when you string your beads onto your thread ( first row), you tie them to make a circle then work from there. | ||
|
|
||
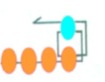


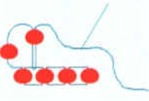
| Brick, Comanche or Cheyenne stitch: | ||
| Brick, Comanche or Cheyenne stitch: A technique in which thread is passed through one bead, looped around the thread of the row directly below that bead, and returned through the same bead. Another bead is then picked up and the process is repeated. | ||
| Instructions | ||
|
||
|
|
||
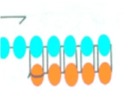
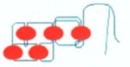
| Adding Rows | ||
|
|
||
|
Now that you have your first row done, you will start to add rows on top of this base row or anchor row.
At this point there are two steps you can take. One is to continue to decrease as you would if you were making earrings, or you can increase to each row. |
||
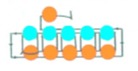
| Increasing | ||
|
There are two steps you take to increase a row. One is to add a bead on the beginning of the row and one to the end.
If you want to increase by more then one bead per row, you would follow the same procedures as if you were doing a base row. |
||
|
|
|
|
| OK, now that we have learned these, I have another step to tell you about ... What if you want to decrease more then one bead? Well, here is how you do this | ||
| Decreasing | ||
You can search the web for different sites on beading tutorials for these techniques. |
||
|
|
||

|
In the Next Beading Series article will be - the Gourd stitch and Two-Needle Gourd stitch. |
|
|
| Books |
| The Beader's Companion by Judith Durant, Jean Campbell Indian Bead-Weaving Patterns : Chain-Weaving Designs and Bead Loom Weaving-An Illustrated 'How-To' Guide by Horace Goodhue Beadworking With Today's Material by Loren and Donna Woerpel |
|
|
|
|
||
|
|
||
|
|
||
| Canku Ota is a free Newsletter celebrating Native America, its traditions and accomplishments . We do not provide subscriber or visitor names to anyone. Some articles presented in Canku Ota may contain copyright material. We have received appropriate permissions for republishing any articles. Material appearing here is distributed without profit or monetary gain to those who have expressed an interest. This is in accordance with Title 17 U.S.C. section 107. | ||
|
Canku Ota is a copyright © 2000, 2001 of Vicki Lockard and Paul Barry. |
||
|
|
|
|
|
The "Canku Ota - A Newsletter Celebrating Native America" web site and its design is the |
||
|
Copyright © 1999, 2000, 2001 of Paul C. Barry. |
||
|
All Rights Reserved. |