|
|
Canku Ota |
|
|
(Many Paths) |
||
|
An Online Newsletter Celebrating Native America |
||
|
March 10, 2001 - Issue 31 |
||
|
|
||
|
The Beading Series-Part 2 |
||
|
by Lynne SageFlower Pennington |
||
|
|
| This is the second installment of the beading series, the technique I will be talking about
is Appliqué/Embroidery Technique & Beading stitch Methods-Backstitch, Couching & Lazy stitch. I
advise you to read this over with your parents in case there are parts of instructions that you need their help
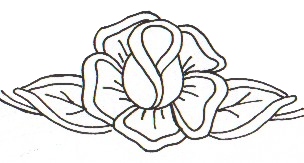
with. Questions and Answers 1. What is the Appliqué or Embroidery Technique? A technique in which beads are sewn individually or in a series to form the design. The appearance of the finished work is quite similar to embroidery. 2. What is the back stitch or couching stitch? A stitching method used to sew a line of seed beads to a backing, usually of leather, canvas, or other cloth. Back stitching is using one needle. Couching is using two needles. From one to three beads are attached with a simple stitch, then the thread is sewn back through one or more of these beads, and the stitch is repeated. 3. What is the lazy stitch? A stitching method in which you can cover large to small areas. It is also a very quick stitch to use. It is basically done in straight lines and used for geometric designs. You can use it in place of other stitches such as filling in and area on a rosette or embroidery. You can use from 4 to 8 beads but using 4 beads makes a tighter more uniform stitch. The lazy stitch does not lie flat but has a slight bow to it in the middle. This gives the beadwork dimension. 4. How do I go about getting a design for this technique? There are many ways to find a design you want to do. I have found them in coloring books, stencils for walls, Appliqué books, on the web, Stain Glass patterns and several other places. Once I have found the design you want to use I scan it if I have to then print it out. After I print the design out I then decide what color beads I want to use and map them put on my design Example: |
|
|
|
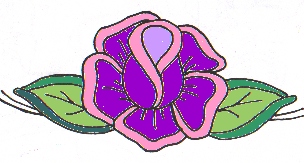
| For this flower I decided to use: Dark green to outline the leaves and light green for the
inside leaf. For the outer edging of the flower a rose color and for the inside petals a violet color. For the
very inside of the flower a light purple. I did not do the two stems coming out from the leaves. 5. What materials can I use to put my design on? When choosing your material keep in mind the color beads you are going to use. You want your beading to stand out. You can use suede, garment leather or velvet. Use a solid color. You can use fabric like broadcloth but you need a material backing to stiffen it. I use iron on interfacing fabric as a stiffener. 6. How do I put the design on my material? Using a disappearing ink pen to draw the design on your material. If it is a dark material use a white dress makers pen that disappears. You can find these pens in any fabric store or craft store. 7. How do I go about beading my design? Always start by beading the outline of you design first. Depending on the proportions of your design you may want to outline the design with one, two or three rows. Follow the curve or lines of your design. Then work on the interior of your design. The interior of each section can be filled in with circular, horizontal, vertical or diagonal bead designs using the couching stitch. It is up to you if you want to use another stitch such as the lazy stitch to fill in the interior. When beading the interior try not to crowd the beads, you want your fabric to lie flat. You can always add beads into it later. 8. What if I have a design that is large? If you are going to be beading a large piece of material I suggest thumb tacking the material to a frame to keep it tight. You can have someone make one for you or purchase a frame to do large needle point or hook rugs on from a craft store or company . I got mine long ago from Mary Maxims needlework and crafts catalog. I will put some links for craft companies you can get then from under links. 9. What can I use if I am only doing a small design? If you are only doing small design, use an embroidery hoop. Place the fabric over the lower part of the hoop, center your design, then secure it with the upper part of the hoop. I suggest not using an embroidery hoop for larger projects because you do not want to break the beads when you go to do the next section of your design. This can occur when you go to secure the upper part of the hoop. 10. After I have done my design on the material I used the threads are showing on the back. How do you hide them? Once you have finished your project, sew a liner or backing onto it to help prevent wear on the threads and hide your threads. I use Wonder Under and iron on the same material that I used as a backing. Instructions for Stitching Methods |
|
|
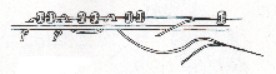
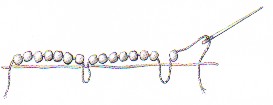
Single Needle-Backstitch
Two Needle Method-Couching
Lazy Stitch For these instructions I am going to be using 6 beads as in the diagram.
Remember the above stitching methods because you will also be using them when I talk about rosettes in the next Beading Series Installment-Rosettes. |
|
Books |
|
Magazines |
|
Web Links |
|
NativeTech |
|
Historic Crafts &
Skills |
|
Native American Beadwork: Modern
Techniques |
|
|
||
|
|
||
|
|
||
| Canku Ota is a free Newsletter celebrating Native America, its traditions and accomplishments . We do not provide subscriber or visitor names to anyone. Some articles presented in Canku Ota may contain copyright material. We have received appropriate permissions for republishing any articles. Material appearing here is distributed without profit or monetary gain to those who have expressed an interest. This is in accordance with Title 17 U.S.C. section 107. | ||
|
Canku Ota is a copyright © 2000, 2001 of Vicki Lockard and Paul Barry. |
||
|
|
The "Canku Ota - A Newsletter Celebrating Native America" web site and its design is the |
|
|
Copyright © 1999, 2000, 2001 of Paul C. Barry. |
||
|
All Rights Reserved. |